网关分类 常见的开源网关按照语言分类有如下几类:
Nginx+Lua: OpenResty、Kong 等;
Java: Zuul1/Zuul2、Spring Cloud Gateway、gravitee-gateway、Shenyu 等;
Go: janus、GoKu API Gateway 等;
Node.js: Express Gateway、
MicroGateway 等。
我们主要考虑 Java 语言的网关。接下来调研了Zuul1、Zuul2、Spring Cloud Gateway、Dromara Soul。
业界主流的网关基本上可以分为下面四种:
在进行技术选型的时候,主要考虑功能丰富度、性能、稳定性。Zuul2 是一个基于 Netty 框架的异步非阻塞的高性能网关。
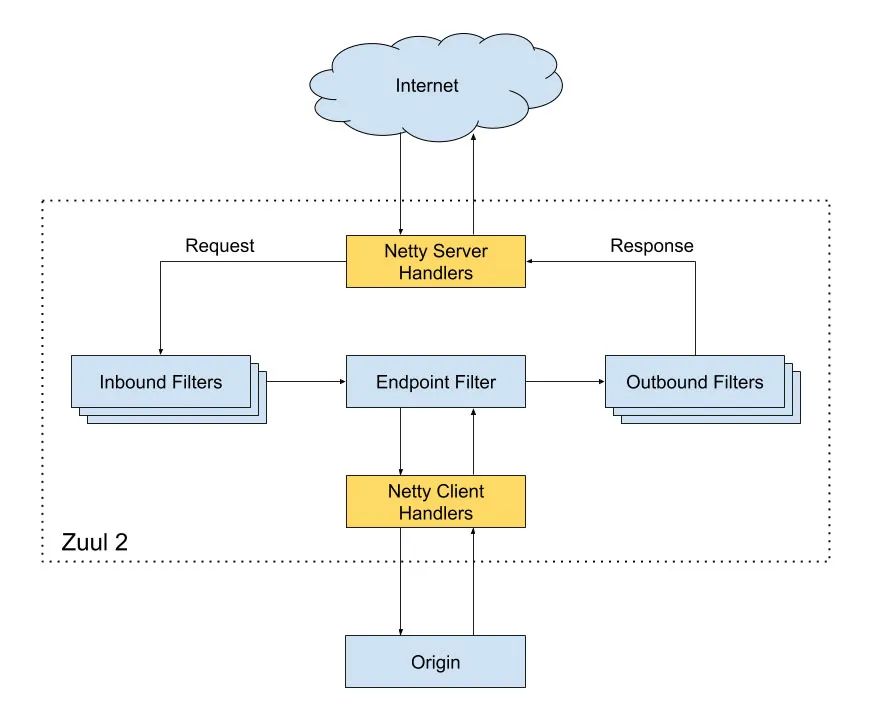
Zuul2 整体概览 接下来我们简要介绍一下 Zuul2 关键知识点。
Zuul2 的架构图:
为了解释上面这张图,接下来会分别介绍几个点
如何解析 HTTP 协议 学习Zuul2需要一定的铺垫知识,比如:Google Guice、RxJava、Netflix archaius等,但是更关键的应该是:如何解析HTTP协议,会影响到后续Filter责任链的原理解析,为此先分析这个关键点。
首先我们介绍官方文档 中的一段话:
By default Zuul doesn’t buffer body content, meaning it streams the received headers to the origin before the body has been received.
This streaming behavior is very efficient and desirable, as long as your filter logic depends on header data.
翻译成中文:
默认情况下Zuul2并不会缓存请求体,也就意味着它可能会先发送接收到的请求Headers到后端服务,之后接收到请求体再继续发送到后端服务,发送请求体的时候,也不是组装为一个完整数据之后才发,而是接收到一部分,就转发一部分。
这个流式行为是高效的,只要Filter过滤的时候只依赖Headers的数据进行逻辑处理,而不需要解析RequestBody。
上面这段话映射到Netty Handler中,则意味着Zuul2并没有使用HttpObjectAggregator。
我们先看一下常规的Netty Server处理HTTP协议的样例:
NettyServer样例:
1
2
3
4
5
6
7
8
9
10
11
12
13
14
15
16
17
18
19
20
21
22
23
24
25
26
27
28
29
30
31
32
33
34
35
36
@Slf4j public class ConfigServerBootstrap { public static final int WORKER_THREAD_COUNT = Runtime.getRuntime().availableProcessors(); public void start () { int port = 8080 ; EventLoopGroup bossGroup = new NioEventLoopGroup (1 ); EventLoopGroup workerGroup = new NioEventLoopGroup (WORKER_THREAD_COUNT); final BizServerHandler bizServerHandler = new BizServerHandler (); try { ServerBootstrap serverBootstrap = new ServerBootstrap (); serverBootstrap.group(bossGroup, workerGroup) .channel(NioServerSocketChannel.class) .childHandler(new ChannelInitializer <Channel>() { @Override protected void initChannel (Channel ch) throws Exception { ChannelPipeline pipeline = ch.pipeline(); pipeline.addLast(new IdleStateHandler (10 , 10 , 0 )); pipeline.addLast(new HttpServerCodec ()); pipeline.addLast(new HttpObjectAggregator (500 * 1024 * 1024 )); pipeline.addLast(bizServerHandler); } }); log.info("start netty server, port:{}" , port); serverBootstrap.bind(port).sync(); } catch (InterruptedException e) { bossGroup.shutdownGracefully(); workerGroup.shutdownGracefully(); log.error(String.format("start netty server error, port:%s" , port), e); } } }
这个例子中的两个关键类为:HttpServerCodec、HttpObjectAggregator。
HttpServerCodec是HttpRequestDecoder、HttpResponseEncoder的组合器。
HttpObjectAggregator的作用:组装HttpMessage、HttpContent为一个完整的FullHttpRequest或者FullHttpResponse。
当你不想关心chunked分块传输的时候,使用HttpObjectAggregator是非常有用的。
HTTP协议通常使用Content-Length来标识body的长度,在服务器端,需要先申请对应长度的buffer,然后再赋值。如果需要一边生产数据一边发送数据,就需要使用”Transfer-Encoding: chunked” 来代替Content-Length,也就是对数据进行分块传输。
接下来我们看一下Zuul2为了解析HTTP协议做了哪些处理。
Zuul的源码:https://github.com/Netflix/zuul ,基于v2.1.5。
1 2 3 4 5 6 7 8 protected void addHttp1Handlers (ChannelPipeline pipeline) { pipeline.addLast(HTTP_CODEC_HANDLER_NAME, createHttpServerCodec()); pipeline.addLast(new Http1ConnectionCloseHandler (connCloseDelay)); pipeline.addLast("conn_expiry_handler" , new Http1ConnectionExpiryHandler (maxRequestsPerConnection, maxRequestsPerConnectionInBrownout, connectionExpiry)); }
1 2 3 4 5 6 7 8 9 protected HttpServerCodec createHttpServerCodec () { return new HttpServerCodec ( MAX_INITIAL_LINE_LENGTH.get(), MAX_HEADER_SIZE.get(), MAX_CHUNK_SIZE.get(), false ); }
通过对比上面的样例发现,Zuul2并没有添加HttpObjectAggregator,也就是需要自行去处理chunked分块传输问题、自行组装请求体数据。
为了解决上面说的chunked分块传输问题,Zuul2通过判断是否LastHttpContent,来判断是否接收完成。
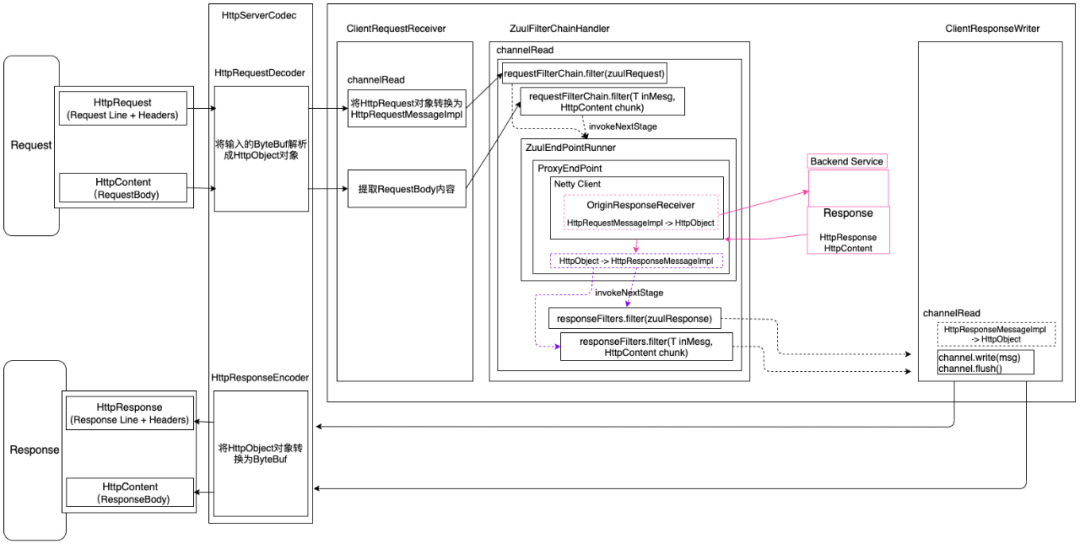
Zuul2 数据流转
如上图所示,Netty自带的HttpServerCodec会将网络二进制流转换为Netty的HttpRequest对象,再通过ClientRequestReceiver编解码器将HttpRequest转换为Zuul的请求对象HttpRequestMessageImpl;
请求体RequestBody在Netty自带的HttpServerCodec中被映射为HttpContent对象,ClientRequestReceiver编解码器依次接收HttpContent对象。
完成了上述数据的转换之后,就流转到了最重要的编解码ZuulFilterChainHandler,里面会执行Filter链,也会发起网络请求到真正的后端服务,这一切都是在ZuulFilterChainHandler中完成的。
得到了后端服务的响应结果之后,也经过了Outbound Filter的过滤,接下来就是通过ClientResponseWriter把Zuul自定义的响应对象HttpResponseMessageImpl转换为Netty的HttpResponse对象,然后通过HttpServerCodec转换为ByteBuf对象,发送网络二进制流,完成响应结果的输出。
这里需要特别说明的是:由于Zuul2默认不组装一个完整的请求对象/响应对象,所以Zuul2是分别针对请求头+请求Headers、请求体进行Filter过滤拦截的,也就是说对于请求,会走两遍前置Filter链,对于响应结果,也是会走两遍后置Filter链拦截 。
两个责任链 Netty ChannelPipeline责任链 Netty的ChannelPipeline设计,通过往ChannelPipeline中动态增减Handler进行定制扩展。
接下来看一下Zuul2 Netty Server中的pipeline有哪些Handler?
接着继续看一下Zuul2 Netty Client的Handler有哪些?
本文不针对具体的Handler进行详细解释,主要是给大家一个整体的视图。
Filter责任链
请求发送到Netty Server中,先进行Inbound Filters的拦截处理,接着会调用Endpoint Filter,这里默认为ProxyEndPoint(里面封装了Netty Client),发送请求到真实后端服务,获取到响应结果之后,再执行Outbound Filters,最终返回响应结果。
三种类型的Filter之间是通过nextStage属性来衔接的。
Zuul2存在一个定时任务线程GroovyFilterFileManagerPoller,定期扫描特定的目录,通过比对文件的更新时间戳,来判断是否发生变化,如果有变化,则重新编译并放入到内存中。
通过定位任务实现了Filter的动态加载。
源码剖析 从整体来看,Zuul2是一个在 Netty 上运行一系列Filter的服务,执行完成PreFilter (inbound filters)之后将请求通过 Netty Client 转发出去,然后将请求的结果通过一系列PostFilter (outbound filters) 返回。
Zuul2的Filter分为三种类型:
Inbound Filters: 在路由之前执行
Endpoint Filters: 路由操作
Outbound Filters: 得到相应数据之后执行。
我们用官方的Demo进行分析 zuul-sample ,如下图所示:
ServerStartup 在Demo的启动中,我们发现启动的入口
1
2
3
4
5
6
7
8
9
10
11
12
13
14
15
try { Injector injector = Guice.createInjector(new ZuulSampleModule ()); BaseServerStartup serverStartup = injector.getInstance(BaseServerStartup.class); server = serverStartup.server(); server.start(); long startupDuration = System.nanoTime() - startNanos; logger.info( "Zuul Sample: finished startup. Duration = {}ms" , TimeUnit.NANOSECONDS.toMillis(startupDuration)); server.awaitTermination(); } catch (Throwable t) { ... } finally { ... }
首先使用的是Google的Guice进行依赖注入,拿到一个BaseServerStartup对象, 然后启动一个服务。
我们从这个 start() 作为我们的突破口:
1
2
3
4
5
6
7
8
9
10
11
12
13
14
15
16
17
18
19
20
21
22
23
24
25
26
27
28
29
30
31
32
33
34
35
36
37
38
39
public void start () { if (jvmShutdownHook != null ) { Runtime.getRuntime().addShutdownHook(jvmShutdownHook); } serverGroup = new ServerGroup ( "Salamander" , eventLoopConfig.acceptorCount(), eventLoopConfig.eventLoopCount(), eventLoopGroupMetrics); serverGroup.initializeTransport(); try { List<ChannelFuture> allBindFutures = new ArrayList <>(addressesToInitializers.size()); for (Map.Entry<NamedSocketAddress, ? extends ChannelInitializer <?>> entry : addressesToInitializers.entrySet()) { NamedSocketAddress requestedNamedAddr = entry.getKey(); ChannelFuture nettyServerFuture = setupServerBootstrap(requestedNamedAddr, entry.getValue()); Channel chan = nettyServerFuture.channel(); addressesToChannels.put(requestedNamedAddr.withNewSocket(chan.localAddress()), chan); allBindFutures.add(nettyServerFuture); } if (!allBindFutures.isEmpty()) { ByteBufAllocator alloc = allBindFutures.get(0 ).channel().alloc(); if (alloc instanceof ByteBufAllocatorMetricProvider) { ByteBufAllocatorMetric metrics = ((ByteBufAllocatorMetricProvider) alloc).metric(); PolledMeter.using(registry) .withId(registry.createId("zuul.nettybuffermem.live" , "type" , "heap" )) .monitorValue(metrics, ByteBufAllocatorMetric::usedHeapMemory); PolledMeter.using(registry) .withId(registry.createId("zuul.nettybuffermem.live" , "type" , "direct" )) .monitorValue(metrics, ByteBufAllocatorMetric::usedDirectMemory); } } } catch (InterruptedException e) { Thread.currentThread().interrupt(); } }
可以看到,这里主要是绑定了future的回调关系,然后有一个函数setupServerBootstrap,我们知道Netty需要使用 ServerBootstrap 进行 端口绑定,那么重点关注这个函数:
1
2
3
4
5
6
7
8
9
10
11
12
13
14
15
16
17
18
19
20
21
22
23
24
25
26
27
28
29
30
31
32
33
34
35
36
37
38
39
40
private ChannelFuture setupServerBootstrap ( NamedSocketAddress listenAddress, ChannelInitializer<?> channelInitializer) throws InterruptedException { ServerBootstrap serverBootstrap = new ServerBootstrap ().group(serverGroup.clientToProxyBossPool, serverGroup.clientToProxyWorkerPool); LOG.info("Proxy listening with {}" , serverGroup.channelType); serverBootstrap.channel(serverGroup.channelType); serverBootstrap.option(ChannelOption.SO_BACKLOG, 128 ); serverBootstrap.childOption(ChannelOption.SO_LINGER, -1 ); serverBootstrap.childOption(ChannelOption.TCP_NODELAY, true ); serverBootstrap.childOption(ChannelOption.SO_KEEPALIVE, true ); for (Map.Entry<ChannelOption<?>, ?> optionEntry : serverGroup.transportChannelOptions.entrySet()) { serverBootstrap = serverBootstrap.option((ChannelOption) optionEntry.getKey(), optionEntry.getValue()); } serverBootstrap.handler(new NewConnHandler ()); serverBootstrap.childHandler(channelInitializer); serverBootstrap.validate(); LOG.info("Binding to : {}" , listenAddress); if (MANUAL_DISCOVERY_STATUS.get()) { serverStatusManager.localStatus(InstanceInfo.InstanceStatus.UP); } ChannelFuture bindFuture = serverBootstrap.bind(listenAddress.unwrap()); try { return bindFuture.sync(); } catch (Exception e) { throw new RuntimeException ("Failed to bind on addr " + listenAddress, e); } }
可以看到其中创建了一个serverBootstrap对象,然后对其进行了参数设置,这个正是Netty的启动类,是zuul2的核心。最后调用bindFuture.sync()进行同步等待。
我们已经发现了Zuul2是如何启动一个Netty服务的,那我们接下来去了解最为重要的这些Filter是如何工作的,我们在上文启动中已经发现一个很重要的对象 channelInitializer 。
1 serverBootstrap.childHandler(channelInitializer);
我们知道在Netty中,是将一系列的 Handler 聚合在一起并使用 Pipeline 执行,那么我们从这个 channelInitializer 入手去研究。
channelInitializer是作为参数传入setupServerBootstrap函数的,我们找到调用方,发现是个MapaddressesToInitializers中的key,再找到这个 Map 的定义:
1 2 3 4 5 6 7 8 9 10 11 12 13 14 15 16 17 18 19 20 21 private final Map<NamedSocketAddress, ? extends ChannelInitializer <?>> addressesToInitializers;public Server ( Registry registry, ServerStatusManager serverStatusManager, Map<NamedSocketAddress, ? extends ChannelInitializer<?>> addressesToInitializers, ClientConnectionsShutdown clientConnectionsShutdown, EventLoopGroupMetrics eventLoopGroupMetrics, EventLoopConfig eventLoopConfig, Thread jvmShutdownHook) { this .registry = Objects.requireNonNull(registry); this .addressesToInitializers = Collections.unmodifiableMap(new LinkedHashMap <>(addressesToInitializers; this .serverStatusManager = Preconditions.checkNotNull(serverStatusManager, "serverStatusManager" ); this .clientConnectionsShutdown = Preconditions.checkNotNull(clientConnectionsShutdown, "clientConnectionsShutdown" ); this .eventLoopConfig = Preconditions.checkNotNull(eventLoopConfig, "eventLoopConfig" ); this .eventLoopGroupMetrics = Preconditions.checkNotNull(eventLoopGroupMetrics, "eventLoopGroupMetrics" ); this .jvmShutdownHook = jvmShutdownHook; }
接下来,找到初始化Server的地方,在BaseServerStartup的init方法中。
1
2
3
4
5
6
7
8
9
10
11
12
13
14
15
16
17
@Inject public void init () throws Exception { ChannelGroup clientChannels = new DefaultChannelGroup (GlobalEventExecutor.INSTANCE); clientConnectionsShutdown = new ClientConnectionsShutdown (clientChannels, GlobalEventExecutor.INSTANCE, discoveryClient); addrsToChannelInitializers = chooseAddrsAndChannels(clientChannels); server = new Server ( registry, serverStatusManager, addrsToChannelInitializers, clientConnectionsShutdown, eventLoopGroupMetrics, eventLoopConfig); }
可以发现,我们心心念念的addrsToChannelInitializers通过函数chooseAddrsAndChannels构造。
继续深入:
1
2
3
4
5
6
7
8
9
10
11
12
@ForOverride protected Map<NamedSocketAddress, ChannelInitializer<?>> chooseAddrsAndChannels(ChannelGroup clientChannels) { @SuppressWarnings("unchecked") Map<Integer, ChannelInitializer<?>> portMap = (Map<Integer, ChannelInitializer<?>>) (Map) choosePortsAndChannels(clientChannels); return Server.convertPortMap(portMap); } @Deprecated protected Map<Integer, ChannelInitializer> choosePortsAndChannels (ChannelGroup clientChannels) { throw new UnsupportedOperationException ("unimplemented" ); }
发现该方法是protected的,需要由子类实现,否则会报错。
进入到ServerStartup中,可以发现,正是channelInitializer的构造逻辑,这里笔者为节省篇幅,只给出 HTTP 的示例,其他协议类似。
1
2
3
4
5
6
7
8
9
10
11
12
13
14
15
16
17
18
19
20
21
22
23
24
25
26
27
28
switch (SERVER_TYPE) { case HTTP: channelConfig.set( CommonChannelConfigKeys.allowProxyHeadersWhen, StripUntrustedProxyHeadersHandler.AllowWhen.ALWAYS); channelConfig.set(CommonChannelConfigKeys.preferProxyProtocolForClientIp, false ); channelConfig.set(CommonChannelConfigKeys.isSSlFromIntermediary, false ); channelConfig.set(CommonChannelConfigKeys.withProxyProtocol, false ); addrsToChannels.put( new NamedSocketAddress ("http" , sockAddr), new ZuulServerChannelInitializer (metricId, channelConfig, channelDependencies, clientChannels) { @Override protected void addHttp1Handlers (ChannelPipeline pipeline) { super .addHttp1Handlers(pipeline); pipeline.addLast(new HttpContentCompressor ((CompressionOptions[]) null )); } }); logAddrConfigured(sockAddr); break ; case HTTP2: case HTTP_MUTUAL_TLS: case WEBSOCKET: case SSE: } return Collections.unmodifiableMap(addrsToChannels);
ZuulServerChannelInitializer 我们可以发现 ChannelInitializer 其实是 ZuulServerChannelInitializer 对象。在initChannel中我们发现了
1
2
3
4
5
6
7
8
9
10
11
12
13
@Override protected void initChannel (Channel ch) throws Exception { ChannelPipeline pipeline = ch.pipeline(); storeChannel(ch); addTimeoutHandlers(pipeline); addPassportHandler(pipeline); addTcpRelatedHandlers(pipeline); addHttp1Handlers(pipeline); addHttpRelatedHandlers(pipeline); addZuulHandlers(pipeline); }
在前面的都比较简单都是一些标准的 Handler,最为重要是 addZuulHandlers(pipeline); 这个函数,我们继续深入。
1
2
3
4
5
6
7
protected void addZuulHandlers (final ChannelPipeline pipeline) { pipeline.addLast("logger" , nettyLogger); pipeline.addLast(new ClientRequestReceiver (sessionContextDecorator)); pipeline.addLast(passportLoggingHandler); addZuulFilterChainHandler(pipeline); pipeline.addLast(new ClientResponseWriter (requestCompleteHandler, registry)); }
上面的都很容易看出来,是日志,Session之类的Handler,最为重要的是addZuulFilterChainHandler,此处增加了 ZuulFilter。
继续深入:
1
2
3
4
5
6
7
8
9
10
11
12
13
14
15
16
17
18
19
20
21
22
23
protected void addZuulFilterChainHandler (final ChannelPipeline pipeline) { final ZuulFilter<HttpResponseMessage, HttpResponseMessage>[] responseFilters = getFilters( new OutboundPassportStampingFilter (PassportState.FILTERS_OUTBOUND_START), new OutboundPassportStampingFilter (PassportState.FILTERS_OUTBOUND_END));➊ final ZuulFilterChainRunner<HttpResponseMessage> responseFilterChain = getFilterChainRunner(responseFilters, filterUsageNotifier); final FilterRunner<HttpRequestMessage, HttpResponseMessage> endPoint = getEndpointRunner(responseFilterChain, filterUsageNotifier, filterLoader); final ZuulFilter<HttpRequestMessage, HttpRequestMessage>[] requestFilters = getFilters( new InboundPassportStampingFilter (PassportState.FILTERS_INBOUND_START), new InboundPassportStampingFilter (PassportState.FILTERS_INBOUND_END)); final ZuulFilterChainRunner<HttpRequestMessage> requestFilterChain = getFilterChainRunner(requestFilters, filterUsageNotifier, endPoint); pipeline.addLast(new ZuulFilterChainHandler (requestFilterChain, responseFilterChain)); }
从 ➊ 深入可以看到:
1
2
3
4
5
6
7
8
9
10
11
12
public <T extends ZuulMessage > ZuulFilter<T, T>[] getFilters(ZuulFilter<T, T> start, ZuulFilter<T, T> stop) { final SortedSet<ZuulFilter<?, ?>> zuulFilters = filterLoader.getFiltersByType(start.filterType()); final ZuulFilter<T, T>[] filters = new ZuulFilter [zuulFilters.size() + 2 ]; filters[0 ] = start; int i = 1 ; for (ZuulFilter<?, ?> filter : zuulFilters) { filters[i++] = (ZuulFilter<T, T>) filter; } filters[filters.length - 1 ] = stop; return filters; }
这里返回了一个 ZuulFilter 的数组,开始分别是 start 和 stop 对应的刚好是 OutboundPassportStampingFilter。
然我们继续回到 addZuulFilterChainHandler() 函数上来,我们发现有三段相似的代码正好对应着获得了 InBound OutBond EndPoint 这三种Filter,在代码我们可以看出顺序是
requestFilters 和 endPointFilters 合并成 requestFilterChainresponseFilters 构建成 responseFilterChainrequestFilterChain 和 responseFilterChain 组合成 ZuulFilterChainHandler将 ZuulFilterChainHandler 添加至 pipeline 中
那这里我们还有一个疑问,这些Filter是从何而来的?这个答案隐藏在 com.netflix.zuul.DynamicFilterLoader.getFiltersByType 中,通过简单的跟踪我们可以得到
1
2
3
4
@Override public Collection<ZuulFilter<?, ?>> getAllFilters() { return Collections.unmodifiableList(new ArrayList <>(filters.values())); }
在这里 获得所有的Fiter,而这里的Filter看起来是通过 put进来的,通过一个简单的断点,我们就可以发现:
1
2
3
4
@Override public void put (String key, ZuulFilter<?, ?> filter) { filters.putIfAbsent(Objects.requireNonNull(key, "key" ), Objects.requireNonNull(filter, "filter" )); }
再深入,我们从init理一下调用逻辑:
1
2
3
4
5
6
7
8
9
10
11
12
13
14
15
16
17
18
19
20
21
22
23
24
25
26
27
28
29
30
31
32
33
34
35
36
37
38
39
40
41
42
43
44
45
46
47
48
49
50
51
52
53
54
55
56
57
58
59
60
61
62
63
64
65
66
67
68
69
70
71
72
73
74
75
76
77
78
@Inject public void init () throws Exception { if (!config.enabled) { return ; } long startTime = System.currentTimeMillis(); ThreadFactory tf = new ThreadFactoryBuilder () .setDaemon(true ) .setNameFormat("FilterFileManager_ProcessFiles-%d" ) .build(); this .processFilesService = Executors.newFixedThreadPool(FILE_PROCESSOR_THREADS.get(), tf); filterLoader.putFiltersForClasses(config.getClassNames()); manageFiles(); startPoller(); LOG.warn("Finished loading all zuul filters. Duration = {} ms." , (System.currentTimeMillis() - startTime)); } void manageFiles () { try { List<File> aFiles = getFiles(); processGroovyFiles(aFiles); } catch (Exception e) { String msg = "Error updating groovy filters from disk!" ; LOG.error(msg, e); throw new RuntimeException (msg, e); } } void processGroovyFiles (List<File> aFiles) throws Exception { List<Callable<Boolean>> tasks = new ArrayList <>(); for (File file : aFiles) { tasks.add(() -> { try { return filterLoader.putFilter(file); } catch (Exception e) { LOG.error("Error loading groovy filter from disk! file = {}" , String.valueOf(file), e); return false ; } }); } processFilesService.invokeAll(tasks, FILE_PROCESSOR_TASKS_TIMEOUT_SECS.get(), TimeUnit.SECONDS); } @Override public boolean putFilter (File file) { if (!filterRegistry.isMutable()) { return false ; } try { String sName = file.getAbsolutePath(); if (filterClassLastModified.get(sName) != null && (file.lastModified() != filterClassLastModified.get(sName))) { LOG.debug("reloading filter {}" , sName); filterRegistry.remove(sName); } ZuulFilter<?, ?> filter = filterRegistry.get(sName); if (filter == null ) { Class<?> clazz = compiler.compile(file); if (!Modifier.isAbstract(clazz.getModifiers())) { filter = filterFactory.newInstance(clazz); putFilter(sName, filter, file.lastModified()); return true ; } } } catch (Exception e) { LOG.error("Error loading filter! Continuing. file={}" , file, e); return false ; } return false ; }
可以看到:我们通过类的全称限定类名获得的这个Fitler,这个配置是在我们的配置文件中配置的。
至此,我们已经明白了Zuul2如何将自己的 ZuulFilter 变换成 Netty Handler 并添加到 Netty Pipeline 之中的,那我们还剩下一个问题,这个 ZuulFilter 是如何运作的 。但是我们在上段中,我们已经发现了最后是一个 ZuulFilterChainHandler 通过名称我们可以推测出,这是一个 Chain 链,我们继续往下探索吧。
ZuulFilterChainHandler 我们知道,最终注册到 Netty Pipeline 上的最终肯定是 Handler, 我们只需要从 Netty 的 channelRead() 函数作为突破口去阅读。
1
2
3
4
5
6
7
8
9
10
11
12
13
14
15
16
17
18
@Override public void channelRead (ChannelHandlerContext ctx, Object msg) throws Exception { if (msg instanceof HttpRequestMessage) { ➊ zuulRequest = (HttpRequestMessage) msg; final SessionContext zuulCtx = zuulRequest.getContext(); zuulCtx.put(CommonContextKeys.NETTY_SERVER_CHANNEL_HANDLER_CONTEXT, ctx); requestFilterChain.filter(zuulRequest);➋ } else if ((msg instanceof HttpContent) && (zuulRequest != null )) { ➌ requestFilterChain.filter(zuulRequest, (HttpContent) msg); } else { logger.debug( "Received unrecognized message type. {}" , msg.getClass().getName()); ReferenceCountUtil.release(msg);➍ } }
➊ 这段逻辑处理 已经被转化为 HttpRequestMessage 类型的消息,➋ 是实际上的 filter 处理逻辑。
➌ 处理还没被转化为 HttpRequestMessage 类型的消息。
➍ 无法处理抛出异常,释放MSG。
而这里的 requestFilterChain 就是之前我们传入进去的 ZuulFilterChainRunner 我们看看这 filter() 函数做了什么?
1 2 3 4 5 6 7 8 9 10 11 12 13 14 15 16 17 18 19 20 21 22 23 24 25 26 27 28 29 30 31 32 @Override public void filter (final T inMesg) { try (TaskCloseable ignored = PerfMark.traceTask(this , s -> s.getClass().getSimpleName() + ".filter" )) { addPerfMarkTags(inMesg); runFilters(inMesg, initRunningFilterIndex(inMesg)); } } private final void runFilters (final T mesg, final AtomicInteger runningFilterIdx) { T inMesg = mesg; String filterName = "-" ; try { Preconditions.checkNotNull(mesg, "Input message" ); int i = runningFilterIdx.get(); ➊ while (i < filters.length) { final ZuulFilter<T, T> filter = filters[i]; ➋ filterName = filter.filterName(); final T outMesg = filter(filter, inMesg); ➌ if (outMesg == null ) { return ; } inMesg = outMesg; i = runningFilterIdx.incrementAndGet(); ➍ } invokeNextStage(inMesg); ➎ } catch (Exception ex) { } }
➊ 获得当前运行的Filter的下标值,➋ 获得对应的 ZuulFilter,➌ 调用 ZuulFilter 进行处理,➍ 将下标志值 +1,继续循环体,➎ 执行下个阶段,这里对应着我们自己再构建 new InboundPassportStampingFilter(FILTERS_INBOUND_END)
通过这段代码,我们知道了 Zuul2 的Chain是由 ChainRunner运行。 我们继续看一下 BaseZuulFilterRunner 中的 filter() 函数。
忽略一些次要的代码,我们来看核心逻辑。这里的调用分为同步和异步 :
1
2
3
4
5
6
7
8
9
10
11
if (filter.getSyncType() == FilterSyncType.SYNC) { final SyncZuulFilter<I, O> syncFilter = (SyncZuulFilter) filter; final O outMesg; try (TaskCloseable ignored2 = PerfMark.traceTask(filter, f -> f.filterName() + ".apply" )) { addPerfMarkTags(inMesg); outMesg = syncFilter.apply(inMesg); } recordFilterCompletion(ExecutionStatus.SUCCESS, filter, startTime, inMesg, snapshot); return (outMesg != null ) ? outMesg : filter.getDefaultOutput(inMesg); }
异步:
1 2 3 4 5 6 7 8 9 10 11 12 13 14 15 16 17 18 19 20 21 22 23 24 25 26 27 28 29 30 31 32 33 34 try (TaskCloseable ignored2 = PerfMark.traceTask(filter, f -> f.filterName() + ".applyAsync" )) { final Link nettyToSchedulerLink = PerfMark.linkOut(); filter.incrementConcurrency(); resumer = new FilterChainResumer (inMesg, filter, snapshot, startTime); filter.applyAsync(inMesg) .doOnSubscribe(() -> { try (TaskCloseable ignored3 = PerfMark.traceTask(filter, f -> f.filterName() + ".onSubscribeAsync" )) { PerfMark.linkIn(nettyToSchedulerLink); } }) .doOnNext(resumer.onNextStarted(nettyToSchedulerLink)) .doOnError(resumer.onErrorStarted(nettyToSchedulerLink)) .doOnCompleted(resumer.onCompletedStarted(nettyToSchedulerLink)) .observeOn( Schedulers.from(getChannelHandlerContext(inMesg).executor())) .doOnUnsubscribe(resumer::decrementConcurrency) .subscribe(resumer); } return null ; } catch (Throwable t) { if (resumer != null ) { resumer.decrementConcurrency(); } final O outMesg = handleFilterException(inMesg, filter, t); outMesg.finishBufferedBodyIfIncomplete(); recordFilterCompletion(ExecutionStatus.FAILED, filter, startTime, inMesg, snapshot); return outMesg; } }
ProxyEndpoint 通过上面的一系列分析,我们已经知道的,Zuul的 调用链模型,PreFilters的运行机制。但是,具体的远程调用在哪里体现呢?
在官网的Wiki中,我们也可以获得
Zuul does not use Ribbon for making outgoing connections and instead uses its own connection pool, using a Netty client. Zuul creates a connection pool per host, per event loop. It does this in order to reduce context switching between threads and to ensure sanity for both the inbound event loops and outbound event loops. The result is that the entire request is run on the same thread, regardless of which event loop is running it.
我们从 Wiki 中可以得知,Netty不再默认使用 Ribbon 而是默认使用 Netty 作为一个 Client。
1 2 3 4 5 6 7 8 9 10 11 12 13 14 15 16 17 18 protected ZuulFilter<HttpRequestMessage, HttpResponseMessage> getEndpoint ( final String endpointName, final HttpRequestMessage zuulRequest) { if (PROXY_ENDPOINT_FILTER_NAME.equals(endpointName)) { return newProxyEndpoint(zuulRequest); } return filter; } protected ZuulFilter<HttpRequestMessage, HttpResponseMessage> newProxyEndpoint (HttpRequestMessage zuulRequest) { return new ProxyEndpoint ( zuulRequest, getChannelHandlerContext(zuulRequest), getNextStage(), MethodBinding.NO_OP_BINDING); }
具体逻辑在ProxyEndpoint这个类中 。
我们从filter的核心逻辑 apply看起来。
1
2
3
4
5
6
7
8
9
10
11
12
13
14
15
16
17
18
19
20
public HttpResponseMessage apply (final HttpRequestMessage input) { try { if (origin == null ) { handleNoOriginSelected(); return null ; } origin.onRequestExecutionStart(zuulRequest); proxyRequestToOrigin();➊ return null ; } catch (Exception ex) { handleError(ex); return null ; } }
➊ 将请求转发至远端
1
2
3
4
5
6
7
8
9
10
11
12
13
14
15
16
17
private void proxyRequestToOrigin () { Promise<PooledConnection> promise = null ; try { promise = origin.connectToOrigin( zuulRequest, channelCtx.channel().eventLoop(), attemptNum, passport, chosenServer, chosenHostAddr);➊ if (promise.isDone()) { operationComplete(promise);➋ } else { promise.addListener(this ); } } catch (Exception ex) { } }
➊ 处将请求包装,连接到远端地址,获得 Promise ➋ 结束的 Promise 处理,在 operationComplete() 中包含了成功的执行代码,至于 connectToOrigin Zuul 包装了 Netty的Client
1
2
3
4
5
6
7
8
9
10
11
12
13
14
15
16
17
18
19
20
21
22
23
24
25
26
27
28
29
30
private void writeClientRequestToOrigin (final PooledConnection conn, Duration readTimeout) { final Channel ch = conn.getChannel();➊ passport.setOnChannel(ch); ch.attr(ClientTimeoutHandler.ORIGIN_RESPONSE_READ_TIMEOUT).set(readTimeout); context.put(CommonContextKeys.ORIGIN_CHANNEL, ch); context.set(POOLED_ORIGIN_CONNECTION_KEY, conn); preWriteToOrigin(chosenServer.get(), zuulRequest); final ChannelPipeline pipeline = ch.pipeline(); originResponseReceiver = getOriginResponseReceiver(); pipeline.addBefore( DefaultOriginChannelInitializer.CONNECTION_POOL_HANDLER, OriginResponseReceiver.CHANNEL_HANDLER_NAME, originResponseReceiver); ch.write(zuulRequest);➋ writeBufferedBodyContent(zuulRequest, ch); ch.flush();➌ syncClientAndOriginChannels(channelCtx.channel(), ch); ch.read();➍ originConn = conn; channelCtx.read();➎ }
➊ 获得建立的连接 ➋ 写入Zuul的请求,也就是用户的请求 ➌ 将消息Flush出去 ➍ 在这里读取响应的数据,也就是触发 OutBoundHandler 的处理时间。
之后就继续调用 response filter chain了。
总结 Zuul整体逻辑,我们通过博文可以分析而出。
ZuulFilter 分为 Inbound, Outbound, EndPoint
Inbound, Outbound, EndPoint 包裹成 ChainRunnerChainRunner 组合成一个 ZuulFilterChainHandler,而 ZuulFilterChainHandler 是Netty的 一个HandlerZuulFilterChainHandler 会组装到 Netty 的 Pipeline 中,剩下来就是Netty的流程。
参考